
You've got horizontal rings running around every wall of every print, evenly spaced, like the part was turned on a lathe with a dull bit. You retension the belts. You re-level the bed. You recalibrate extrusion multiplier. You even run an input shaper test because someone in the Discord said "sounds like ringing." Nothing changes. The rings are still there, marching up the wall at the exact same interval, on every single print regardless of geometry, speed, or material.
That's the tell you've been ignoring: Z banding isn't an X/Y problem at all. It lives in the one axis nobody thinks to blame, because it barely seems to move — the Z axis. And on nearly every printer with a lead screw (Ender, CR-10, most Prusa clones, most Bambu-adjacent DIY builds), the Z axis is the least-tuned, least-inspected part of the machine.
The MisdiagnosisWhy This Gets Blamed on Everything Else
Ringing and VFAs both get blamed first because they're the defects everyone's heard of. But both have a signature that Z banding doesn't share: they respond to direction changes and print speed. Slow the print down, and classic ringing softens. Z banding doesn't care. It shows up identically on a 40mm/s test cube and a 150mm/s production part, because it isn't caused by anything happening in the X/Y plane — it's caused by the nozzle's height oscillating slightly as the Z axis rotates through each layer change.
Here's the diagnostic that actually separates the two: measure the band spacing with calipers. If it's random or scales with print speed, you're looking at mechanical resonance in X/Y. If it's a fixed interval — and especially if that interval matches your lead screw's lead (the distance the nut travels per full rotation) or a clean fraction of it — you're looking at a Z-axis problem, full stop. Most 8mm lead screws on hobbyist printers use a 2mm or 8mm lead depending on the thread (T8×2 vs T8×8 / 4-start). Measure a band period near either number and you've found your culprit before you've touched a single slicer setting.
What's Actually Happening
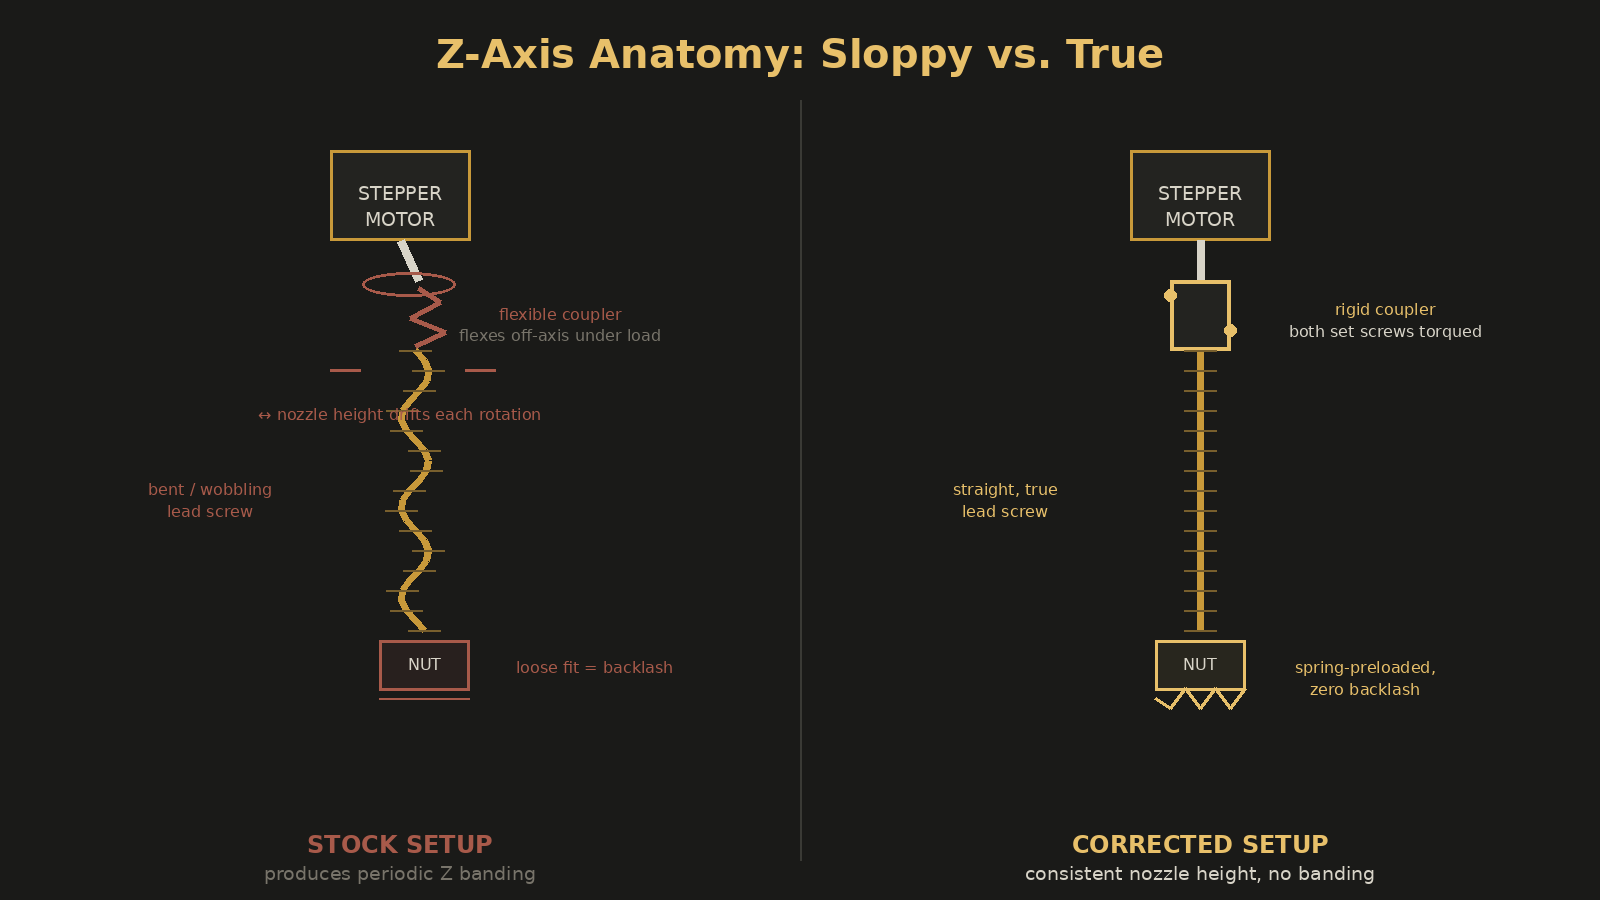
A lead screw doesn't just move the nut up and down — it also carries however much runout is built into the screw itself, the coupler connecting it to the stepper shaft, and the nut-to-screw fit. Three failure points do almost all the damage.
The Coupler
Flexible "spider" couplers tolerate shaft misalignment by flexing — but that flex isn't constant through a full rotation, producing a once-per-rotation height error.
Screw Runout
A bent lead screw — from shipping, drops, or an over-tightened set screw — wobbles every rotation. Visible by eye when spun by hand.
Nut Backlash
Stock brass or Delrin nuts have built-in clearance so they don't bind, letting the nozzle drift before threads re-engage under load.
What "Acceptable" Actually Looks Like
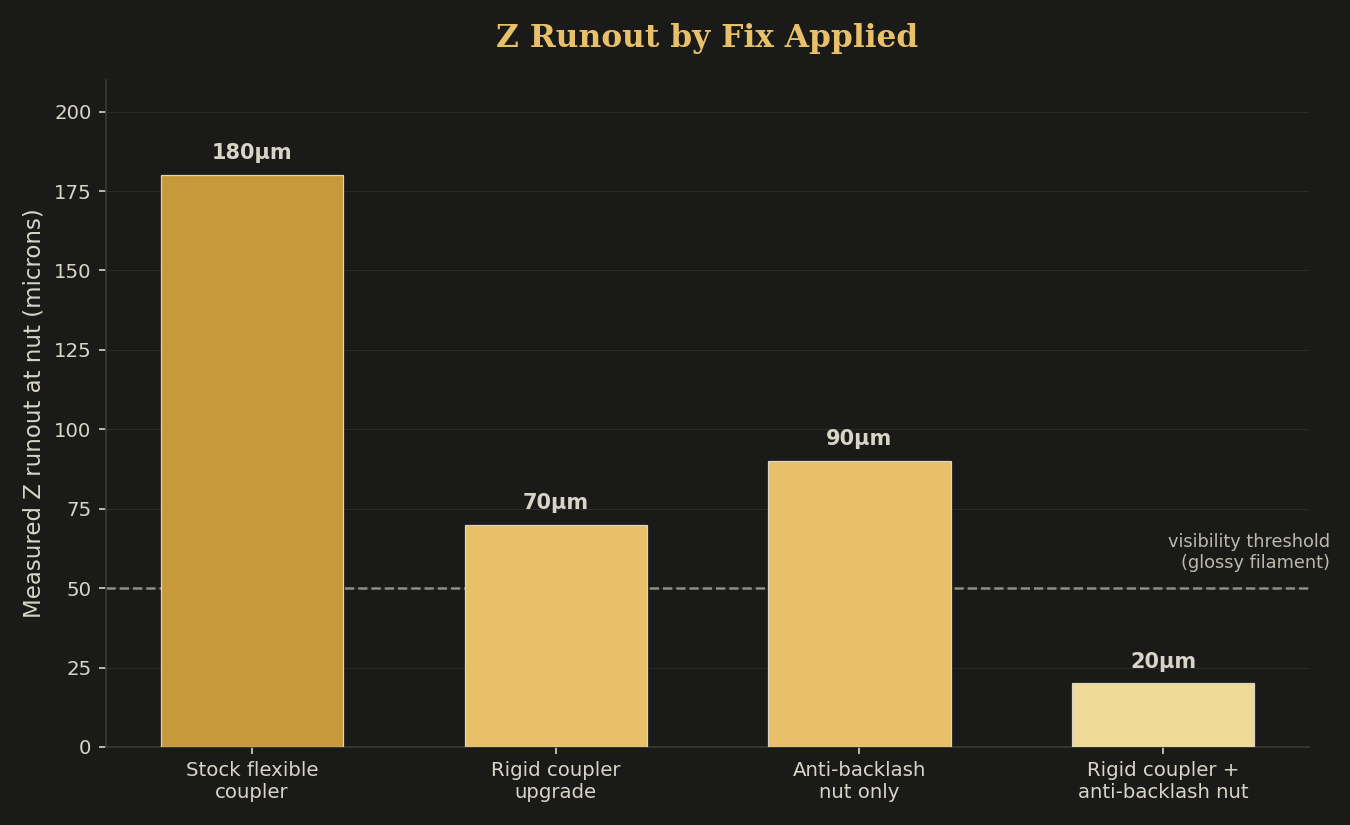
Not every printer is perfectly true, and you don't need lab-grade precision to get clean walls. As a working threshold: runout under roughly 0.05mm measured at the nut, and zero perceptible play when you rock the gantry by hand, prints invisibly at 0.2mm layer heights. Runout in the 0.1–0.2mm range starts showing as faint banding on glossy filaments (PETG, silk PLA) before it's visible on matte ones — so if you're chasing this on a matte PLA part and seeing nothing, don't assume you're in the clear. Switch to a glossy test filament or a raking light across the wall and check again before you rule Z out.
Dual Z PrintersThere's a Fourth Failure Mode
If your printer runs two independent Z steppers (common past the 250mm build volume mark), add synchronization to the list. Two motors driven off the same step signal will still drift relative to each other over time from tiny differences in coupler friction, screw straightness, or belt tension if it's belt-synced. That drift shows up as a banding pattern that slowly changes phase across the bed — worse on one side, better on the other, sometimes disappearing and reappearing as you move across the X axis. Re-homing Z regularly and, if your firmware supports it, running a Z-tilt or gantry-leveling routine before each print keeps the two screws in phase.
The FixThe Fix Order That Actually Works
Don't start by replacing parts. Start by isolating which of the three (or four) failure points is yours:
-
1Spin the screw by hand Power off, disengage the motor, and rotate each Z lead screw by hand while watching the gantry or nozzle height. Visible wobble means a bent screw or bad coupler — not backlash.
-
2Rock the gantry With the printer on and idle, grab the X gantry at the Z axis and gently push up and down. Movement without the motor turning means backlash in the nut, not the screw or coupler.
-
3Measure before you buy Compare your existing band spacing against your screw's lead before ordering anything. It tells you whether you're even chasing the right axis.
The fix, once isolated, is cheap: a rigid coupler ($8–15) or thrust-bearing conversion kit replaces flexible couplers, an anti-backlash nut ($10–20) removes nut slack, and a straight replacement lead screw ($15–25) replaces a bent one. None of it requires touching your slicer profile, your belts, or your input shaper config — because none of those were ever the problem.
- Measure band spacing with calipers before changing any setting
- Rule out X/Y resonance first — does spacing scale with speed?
- Check both coupler set screws, not just one
- Spin the screw by hand and watch for visible wobble
- Rock the gantry by hand to isolate nut backlash
- On dual Z, verify phase sync after every re-level
One More Thing Worth Ruling Out
Before you order parts, check the obvious mechanical stuff you can fix for free: the coupler set screws (both of them — most spider couplers have two, and people tighten one and forget the other), the Z rod's top bearing or bushing if your printer has one, and whether the gantry is binding against the smooth rods from a slightly bent frame extrusion. A coupler set screw riding on the flat of the motor shaft instead of biting into it will slip under load exactly once per rotation and produce a banding artifact indistinguishable from a bad coupler — and it costs nothing to fix, just a hex key and five minutes.
It's worth doing this check even if your prints look fine today. Z-axis wear is slow and cumulative — a coupler that's slightly loose now will be noticeably loose in three months, and by the time the banding is obvious you'll have lost track of when it started. Five minutes with a hex key during your next filament change is cheaper than a troubleshooting session down the road.
If you've already run input shaping calibration and the rings are still there in identical form regardless of speed, stop tuning X/Y. Go measure your Z screw.
Still Fighting This On Your Own Printer?
If it's easier to just have the part made right the first time, tell me what you need — tuned per-material, not left on default settings.
Tell Me What You Need →