A part snaps clean along a layer line and the internet tells you to raise your nozzle temperature. So you go up 10°C, the snap looks a little better, you call it fixed, and three prints later the same part fails at the same layer under the same load. You didn't fix the bond. You masked it.
Nozzle temperature is one input into interlayer bonding, not the control knob. The thing that actually determines whether two layers fuse into one solid or stay two thin sheets glued at the edges is how long the interface between them stays hot enough for the polymer chains to tangle across it — what's usually called the weld window. Temperature affects how wide that window is. Fan speed, print speed, layer height, and ambient temperature decide whether you're inside it or not. Chase temperature alone and you're adjusting one variable in a four-variable problem.
| What You're Seeing | What It Usually Means |
|---|---|
| Clean snap at a layer line, little force needed | Weld window too short — cooling outpaced bonding |
| Visible gaps or hairline voids between layers | Under-extrusion or wet filament, not a thermal issue |
| Only fails near the top of tall, thin sections | Layer time collapsed — each layer cooled before the next arrived |
| Fine on solid infill, fails on thin walls/overhangs | Fan-forced cooling on features with too little print time |
| Fails worse after raising fan speed for detail | Confirms weld window, not extrusion, is the cause |
| Bond strength varies print to print on identical settings | Ambient/chamber temperature swinging between prints |
What the Weld Window Actually Is
When a new layer lays down on top of a cooled one, the interface between them is momentarily hot enough to flow. For that bond to become structural rather than cosmetic, polymer chains from each layer need time to interdiffuse — physically cross the boundary and re-entangle before the interface drops below the material's glass transition (amorphous materials like PETG, PCTG, ABS, ASA) or crystallization range (semi-crystalline materials like PLA and nylon). That diffusion isn't instant. It happens over a window measured in fractions of a second to a couple of seconds, and once the interface cools past that threshold, the chains are frozen in place — whatever entanglement happened is all you get.
This is why two parts printed at the same nozzle temperature can have wildly different Z-strength: temperature sets how mobile the polymer is while it's hot, but it's layer time and cooling rate that decide how long it stays that way.
Why Raising Nozzle Temp Feels Like It Works (and Why It Plateaus)
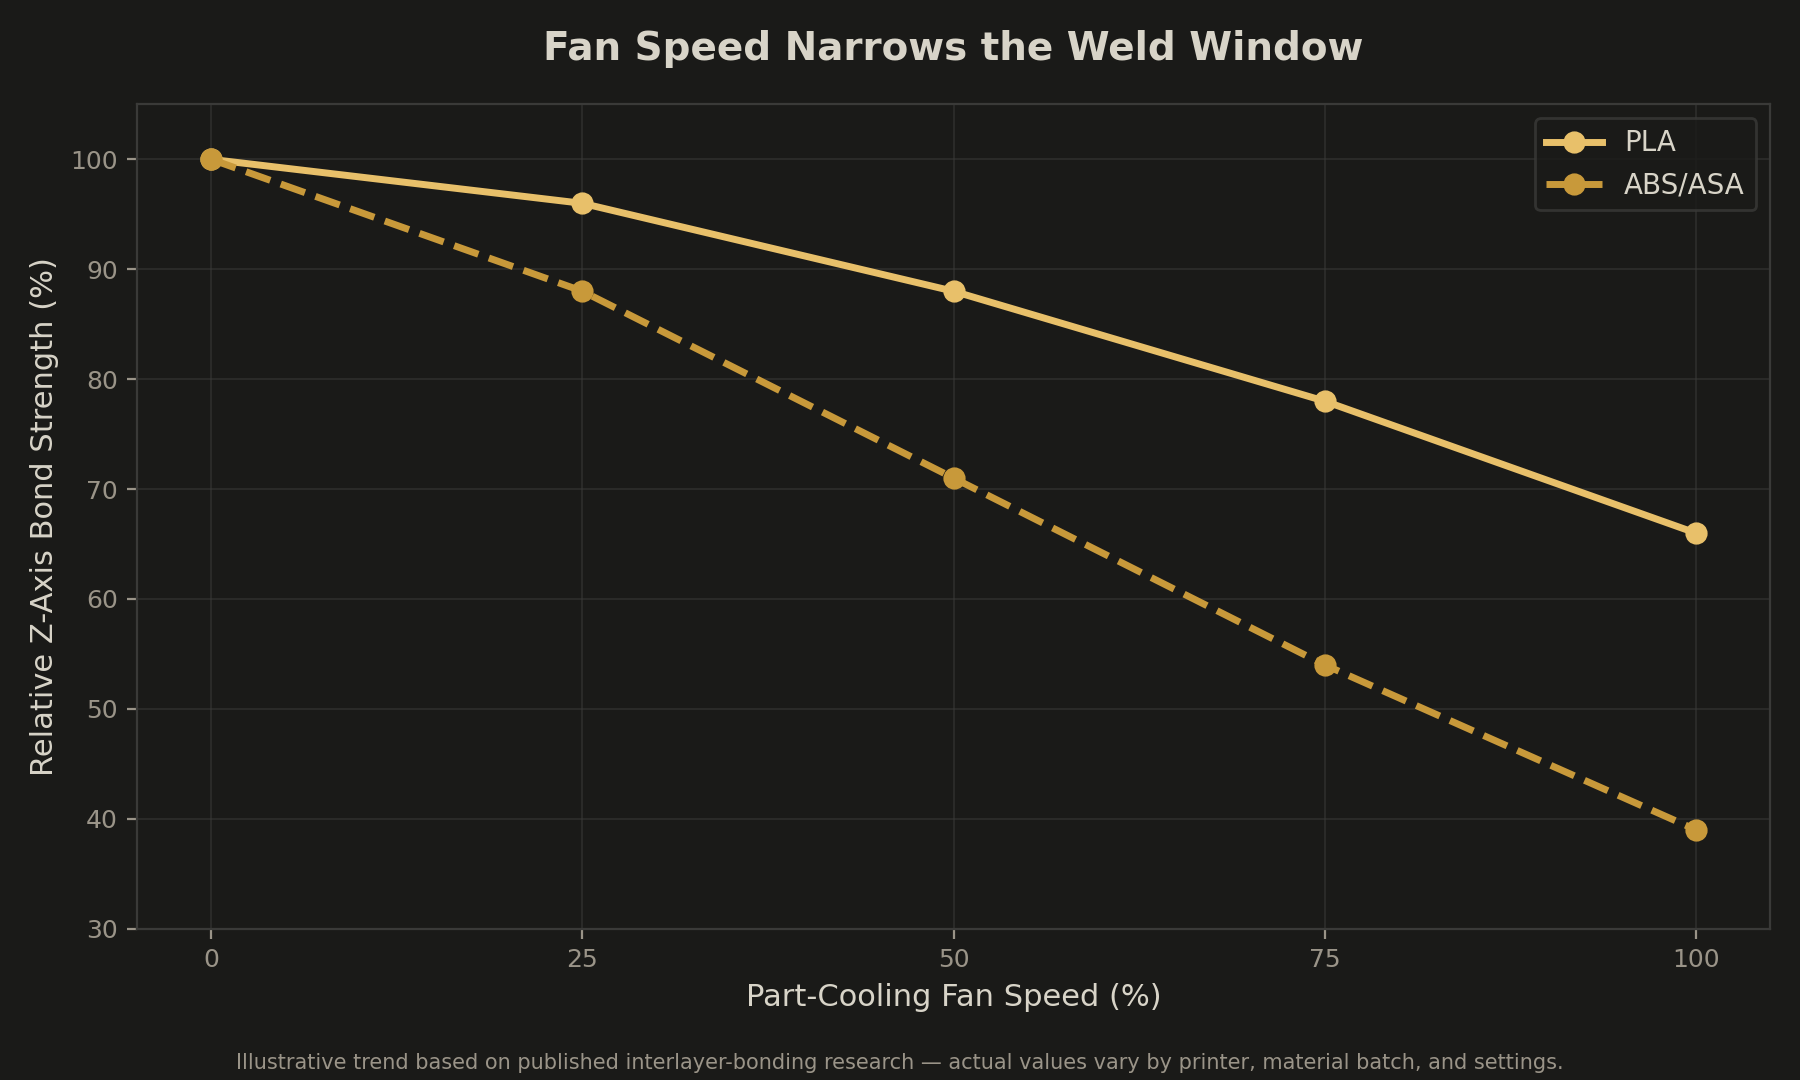
Pushing nozzle temperature up does widen the weld window a little — hotter plastic takes longer to drop below the bonding threshold, so you get a few more milliseconds of diffusion time. That's real, and it's why the advice isn't wrong, just incomplete. It plateaus fast: past a certain point you're fighting stringing, sagging on overhangs, and dimensional bloat before you've bought back meaningful bond strength. If you've already added 15–20°C over the spool's recommended range and Z-strength hasn't moved, temperature isn't your lever anymore. Time is.
The Real LeversThe Four Things That Actually Control the Window
- 1Minimum layer time. Most slicers have a "minimum layer time" setting that slows the printer down on small layers so each one gets enough seconds before the next starts. If it's set below 8–10 seconds, thin walls and small cross-sections are cooling almost fully before the next layer arrives, no matter what your nozzle temp is set to.
- 2Part-cooling fan. Fan cooling is a direct trade against bond time — it's there to fix bridging and overhangs, not to be left at a flat 100% for the whole print. Full cooling on solid vertical walls narrows the weld window on every single layer transition in that region.
- 3Print speed relative to layer height. Thinner layers with more surface area per unit volume cool faster than thick ones at the same speed. If you dropped layer height for surface finish without adjusting speed or cooling, you narrowed the window without meaning to.
- 4Ambient / chamber temperature. An open-frame printer in a cold garage pulls heat out of every layer faster than the same printer in an enclosure at 35–45°C. This is the variable most people don't control for at all, which is why identical slicer profiles produce inconsistent Z-strength between a winter print and a summer print.
Material-by-Material Numbers
| Material | Min. layer time | Fan on solid walls | Notes |
|---|---|---|---|
| PLA | 6–8s | 30–50% | Wide weld window, most forgiving — still fails if fan is pinned at 100% |
| PETG | 8–10s | 10–30% | Narrower window than PLA; too much cooling causes brittle Z-strength fast |
| PCTG | 8–10s | 10–30% | Similar window to PETG, noticeably tougher once bonded — see note below |
| ABS / ASA | 10–12s | 0–15% | Needs an enclosure; ambient temp matters as much as fan here |
| Nylon | 10–15s | 0–10% | Most sensitive to moisture stealing the weld window — dry the spool first |
PCTG's modified CHDM backbone gives it a moisture pickup around 0.15% — well under PLA's — so unlike nylon or PETG, a humid week in the shop won't quietly narrow your weld window through steam pockets at the interface. Combined with a bonding behavior close to PETG's, that makes PCTG one of the more repeatable materials for Z-strength: the variable you're fighting is almost always print settings, not the spool's condition.
Reading the Break Before You Change Anything
How to Actually Test It
Don't trust a single snap test — one bad break can be a void, not a bonding failure. Print three identical single-wall towers (0.4mm wall, 60mm tall) at your current settings, then repeat with minimum layer time raised to 10s and fan capped at 30%. Snap all six by hand at the same height. If the second batch takes visibly more force and shears cleanly through the plastic instead of popping apart at a layer line, you've confirmed the weld window — not the nozzle — was the limiting factor.
- Set minimum layer time to 8–10s before touching temperature
- Cap part-cooling fan at 30% on solid vertical sections
- Increase nozzle temp only after time-based settings are fixed, in 5°C steps
- Enclose ABS/ASA/nylon prints and hold chamber temp steady between prints
- Dry hygroscopic filament before blaming the bond
Z-strength that varies from print to print with identical slicer settings almost always traces back to something changing the weld window between runs — room temperature, a draft, a fan curve you forgot you touched — not a mystery. Fix the time budget first. Temperature is the fine-tuning knob, not the fix.
DuffAM parts run through a controlled enclosure with temperature and layer-time settings locked per material, which is the difference between a part that's cosmetically layered and one that's structurally one piece. For a deeper look at where FDM's real limits sit, see the Realistic Capabilities breakdown on our About page.
Parts That Don't Snap at the Layer Line
Every DuffAM print runs a locked weld window — layer time, fan curve, and chamber temperature dialed per material — so Z-strength doesn't vary from run to run.
Order Direct at DuffAM →A different lever on the same Z-strength problem — heat and time applied after the print instead of during it.
Your Printer Isn't Slow — Your Hotend Is StarvingPrint speed shows up in both posts — here's the flow-rate ceiling that also eats into your weld window.