Annealing gets recommended constantly and explained rarely. Half the advice online is "bake your PLA at 80°C for an hour," which will get you a puddle of curled, cracked plastic instead of a stronger part. The other half treats every material the same, which is how PETG parts end up slumped in a cheap toaster oven. Annealing works — it measurably raises heat resistance and layer strength — but only if you match the temperature and constraint method to what the polymer is actually doing at that temperature.
Here's the honest breakdown by material, with the numbers that matter.
| Symptom / check | What it means |
|---|---|
| Part deforms under load below 60°C (PLA) | Below Tg — annealing candidate, but PLA warps badly unless constrained |
| Part deforms 70–80°C (PETG/PCTG) | Amorphous polymer, needs a rigid fixture during anneal or it slumps |
| Part deforms 90–100°C (ASA/ABS) | Higher Tg gives more headroom — lowest warp risk of the common materials |
| Layers separate under stress despite good print settings | Internal stress from rapid cooling, not under-extrusion — anneal candidate |
| Part needs to survive near boiling water or a car dashboard | PLA/PETG/PCTG alone won't hold — anneal or switch material |
| Unconstrained part visibly slumps mid-anneal | Oven ran too hot or too long for that material — pull it, let it cool flat |
What Annealing Actually Does
Every FDM layer cools fast, and fast-cooling thermoplastic freezes in internal stress and, for semi-crystalline polymers like PLA and nylon, freezes the polymer chains in a mostly amorphous, disordered state. Annealing means holding the part at a temperature near or just above its glass transition (Tg) long enough for chains to relax and, in semi-crystalline materials, pack into a more ordered crystalline structure. Two things happen: internal stress releases, and heat deflection temperature (HDT) goes up — sometimes by 20–40°C. What you lose is dimensional control, because the part is soft enough at that temperature to move, and it will move toward whatever shape gravity and its own residual stress pull it into unless something holds it in place.
That tradeoff is the entire annealing conversation. Every material below is a different point on that same curve.
Big HDT Gain, Biggest Warp Risk
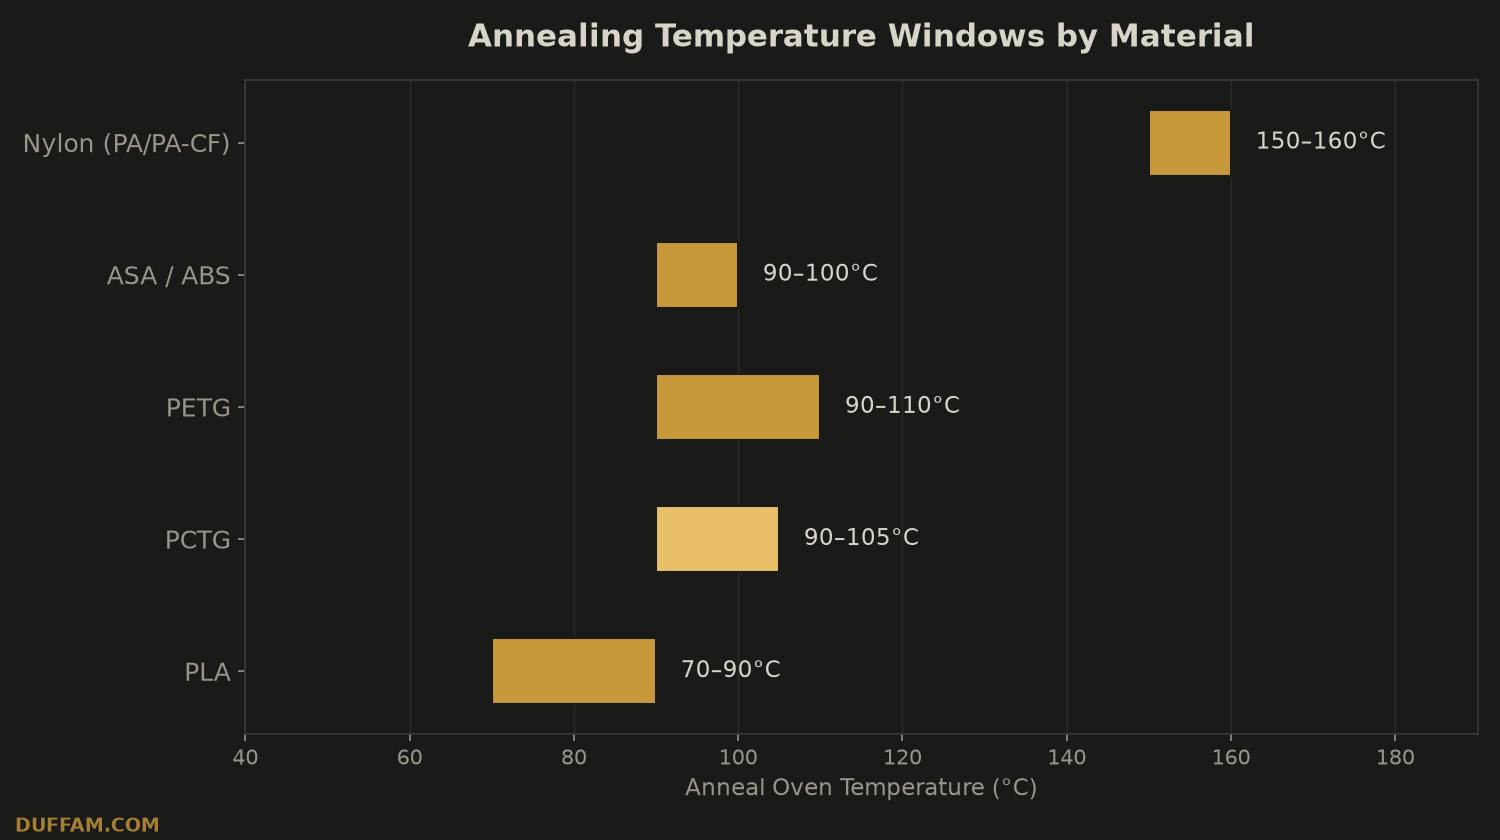
Standard PLA has a Tg around 55–60°C, which is also uncomfortably close to a hot car interior — a good reason to anneal it in the first place. Anneal at 70–90°C for 30–60 minutes and PLA's HDT can jump from roughly 55°C to 90°C or higher as it crystallizes. The catch: PLA is amorphous-heavy and floppy in that temperature window, so unconstrained parts warp, shrink 2–5%, and sometimes go cloudy or brittle if pushed too hot or held too long. Bury the part in fine sand or bead media inside a container before it goes in the oven — the sand holds geometry while heat moves freely — and ramp temperature up gradually (2–4°C per minute) rather than dropping the part into a preheated oven. Cool at a similar slow rate afterward. Skip annealing on parts with tight tolerances or thin unsupported features; the shrinkage isn't uniform enough to predict.
PETG & PCTGNeeds a Jig, Rewards Patience
PETG and PCTG are both amorphous, so there's no crystallization payoff the way there is with PLA — but there's still a real gain in interlayer bonding and stress relief, plus a meaningful HDT bump into the 75–85°C range. Anneal PETG at 90–110°C for 45–90 minutes depending on wall thickness. Either way, amorphous polymers go soft and slumpy well before they melt, so an unconstrained anneal on a part with any overhang or unsupported span will visibly sag. Build or 3D print a simple support jig matching the part's underside, or anneal it resting on its largest flat face, before it goes in the oven.
PCTG behaves similarly to PETG through the anneal but tends to hold dimensions slightly better — its modified CHDM structure gives it lower moisture uptake (around 0.15%, versus PETG's tendency to absorb more) and a bit more melt stability. That's part of why DuffAM treats PCTG as the step-up material when PETG's dimensional drift is the actual problem, not just a materials swap for its own sake.
The Forgiving Ones
ASA and ABS have Tg in the 100–105°C range, which puts real distance between "annealing temperature" and "everyday operating temperature." Anneal at 90–100°C for 30–60 minutes and you get stress relief and improved layer adhesion with markedly less warp risk than PLA or PETG, because the material stays stiffer relative to its glass transition throughout the process. This is also the pair where skipping a jig is most often fine for blocky or symmetric parts — though anything with thin walls or long unsupported spans still benefits from a flat support surface.
NylonThe Material Annealing Was Basically Invented For
Nylon (PA, PA-CF) is semi-crystalline like PLA, and its as-printed crystallinity is genuinely poor — FDM nylon typically prints with lower crystallinity than injection-molded nylon, leaving real strength on the table. Annealing at 150–160°C (some formulations tolerate up to 180°C briefly) for 60–90 minutes lets it recrystallize properly, and the strength and heat resistance gains are the largest of any common FDM material — HDT increases from roughly 50°C unannealed to well over 150°C. The complication is moisture: nylon needs to be bone dry going in, or trapped water will flash to steam and blister the part internally. Dry it first (4–6 hours at 70°C in a filament dryer or oven), then anneal. A standard kitchen oven can hit these numbers, but calibrate it with a separate thermometer first — most home ovens run 10–20°C hot or cold of their dial setting, which is more than enough to undercook or wreck a nylon anneal.
What Not to Bother Annealing
- TPU and other flexibles — won't hold a useful shape at any anneal temp worth using
- PPS-CF and other high-temp engineering filaments — already near their service ceiling, formulated for minimal shrinkage
- Any part whose tolerance budget is tighter than the material's expected anneal shrinkage/warp variance
The One-Sentence Version
Anneal for a real HDT number you can point to, constrain anything amorphous (PETG, PCTG, ASA, ABS) with a jig or a flat support face, bury anything semi-crystalline (PLA) in sand, dry nylon completely before it goes anywhere near heat, and calibrate your oven before you trust its dial. Skip the process entirely for parts that don't have a specific temperature they need to survive — annealing trades dimensional certainty for heat resistance, and that trade is only worth making when you actually need the heat resistance.
If a part's tolerance requirements are tighter than annealing's inherent shrinkage and warp variance allows, that's a sign FDM has hit its ceiling for that application — see the Realistic Capabilities breakdown for where the process limits actually sit.
Skip the Oven Gamble
DuffAM prints and post-processes for the tolerance and heat spec you actually need — no guessing with a kitchen oven and a bag of sand.
Get a Quote →Deciding whether a material is even worth annealing starts with knowing what it's actually good at.
PCTG-CF Outside: What It Handles, and Where ASA Takes OverMore on PCTG's real-world limits if the anneal HDT bump still isn't enough for your application.