If you've read the last post about volumetric flow limits, you know your hotend has a ceiling — a maximum rate at which it can melt and deliver plastic. Pressure Advance is the other side of that equation: it's how your firmware manages the pressure inside the hotend as speed changes, so that plastic arrives exactly when and where the nozzle is.
Most people either have it disabled, set it once with PLA and never touched it again, or copied a number from a forum. All three produce bad prints. Here's why it matters, what it's actually doing, and how to get it right for every material you print.
The PhysicsThe Problem PA Exists to Solve
Filament isn't a rigid rod. Inside your hotend, it's a column of partially melted, pressurized plastic — and that column behaves like a spring.
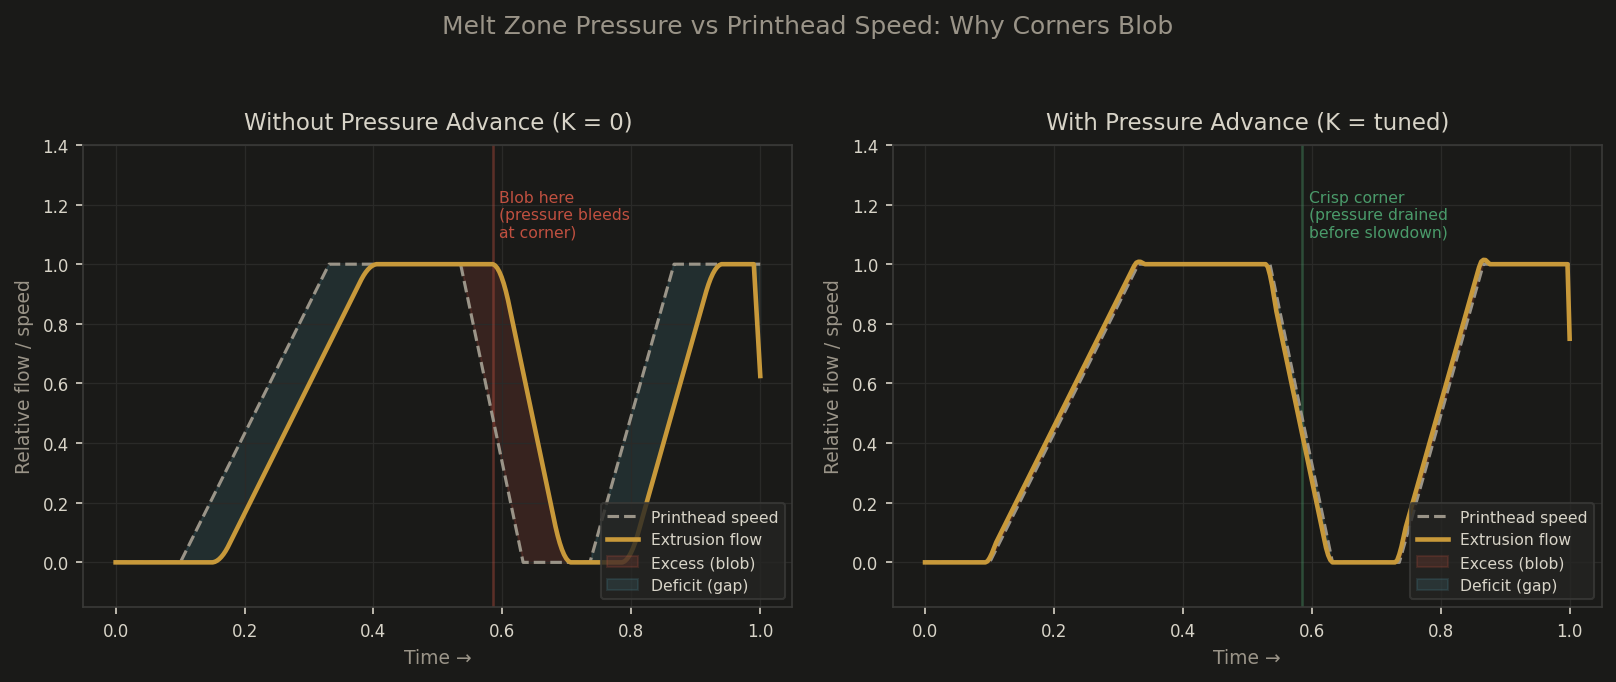
When your printhead accelerates into a move, the extruder starts pushing. But the plastic in the melt zone takes a moment to build pressure and flow out the nozzle. The printhead is already moving; the plastic lags behind. You get underextrusion at the start of the move.
When the printhead decelerates at a corner, the opposite happens. The extruder stops pushing, but the melt zone is still pressurized. That pressure bleeds off through the nozzle — right as the printhead slows and dwells at the corner. Result: a blob of excess plastic exactly where the corner should be sharp.
This isn't a calibration error. It's physics. Pressure Advance (called Linear Advance in Marlin) tells the firmware to compensate: push extra when accelerating to pre-charge the melt zone, pull back slightly when decelerating to drain it before the corner arrives. Done right, plastic exits the nozzle in perfect sync with the printhead's position.
What "K" Actually Controls
The Pressure Advance value is commonly called the K factor. It's a multiplier that tells the firmware how aggressively to adjust extruder position relative to printhead velocity changes.
K Too Low (or Zero)
- Corner blobs — raised bumps at every direction change
- Rounded outer corners on sharp features
- Slightly thick lines at end of wall segments
- Stringing that doesn't respond to retraction changes
K Too High
- Thin or missing material just before corners
- Fine ripples or ridges near direction changes
- Gaps at wall start points
- Looks like under-retraction but retraction tuning doesn't fix it
Why PA Is Per-Filament — and Per-Temperature
This is the part most guides skip. The spring constant of your melt zone — how much pressure builds per unit of extruder force — is directly tied to how viscous your molten plastic is. Change the material or the temperature, and the spring changes. Your K needs to change with it.
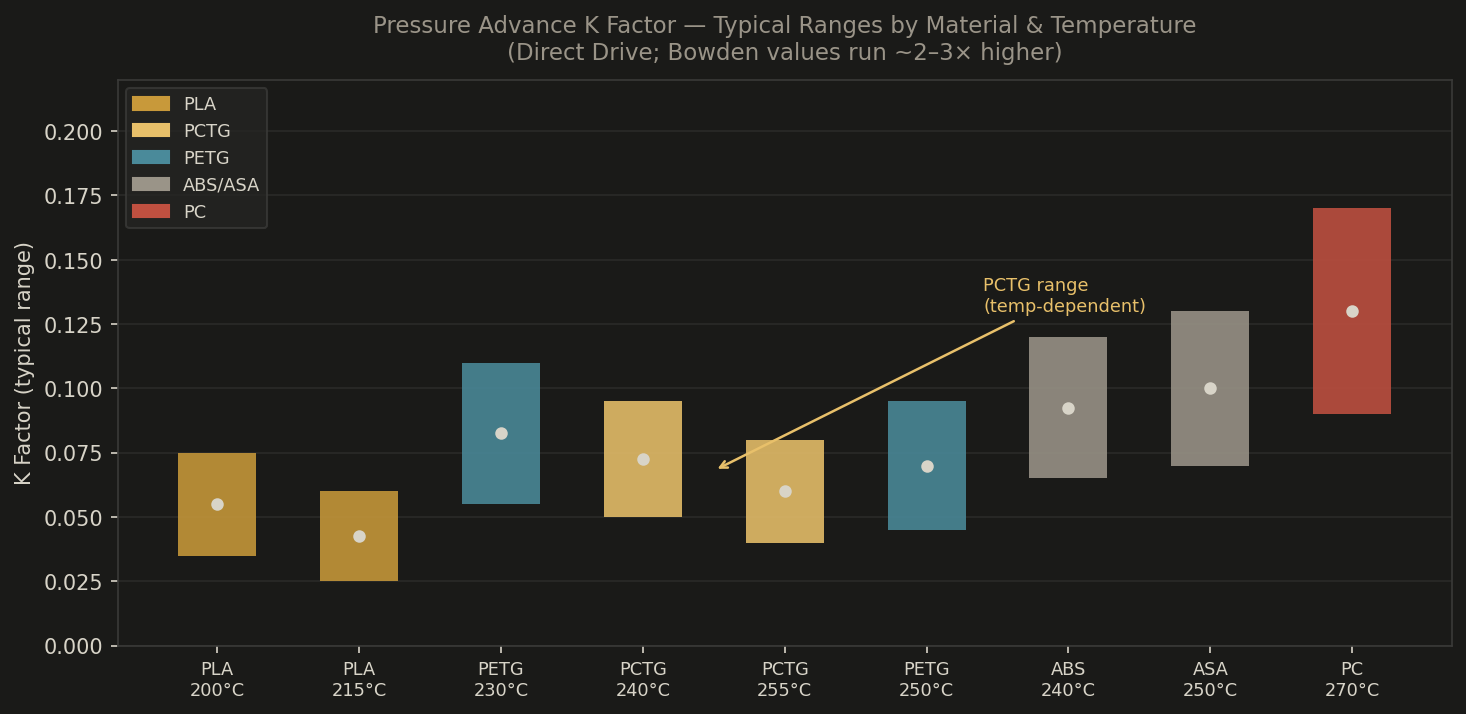
PLA at 200°C is relatively low viscosity. Pressure builds and bleeds off quickly. K typically sits around 0.04–0.08 on a direct drive. PETG at 240°C is noticeably more viscous — pressure builds higher, bleeds more slowly — so K runs 0.06–0.12. ABS and ASA sit higher still. Calibrate once with PLA, switch to PETG, and your corner quality degrades even though you haven't changed "anything."
PCTG — with its CHDM-modified backbone — sits close to PETG in viscosity but with better flow consistency and lower moisture absorption (~0.15%). In practice, PCTG wants a K factor in the PETG range, often at the lower end (0.05–0.09 on direct drive), and responds well at 240–255°C. If you're printing PCTG with your PLA K value, you're undercompensating, and you'll see corner blobs at every direction change. The fix is a fresh PA calibration at your PCTG print temperature — not a retraction adjustment.
Temperature matters within a single filament too: the same PETG at 230°C vs 250°C will need a meaningfully different K, because viscosity drops as temperature rises. The rule is simple: calibrate PA at the temperature you actually print that filament.
What to Verify First
PA calibration assumes your other variables are stable. Before running a PA test:
- Flow rate is within normal range — significant over/underextrusion will mask PA results
- Max volumetric flow is set in your slicer — flow ceiling violations look like bad PA
- Temperature is stable at your target print temp — thermal drift shifts results
- Extruder steps/mm are calibrated — mechanical errors compound PA errors
If you've sorted your volumetric flow ceiling (post 2 in this series), you're already in good shape for steps 1 and 2.
Tuning MethodsHow to Find Your K
-
1OrcaSlicer / Bambu Studio built-in calibration (recommended start) Both slicers have a PA calibration print in their calibration menu. OrcaSlicer's produces a grid of line patterns at varying K and speed, letting you read off the cleanest intersection directly. Fast, visual, no manual math. Start here if you're on either slicer.
-
2Line method (Ellis' Print Tuning Guide) Print a series of straight lines at different K values. Examine line width consistency and corner behavior. Less dramatic visually than the tower but more precise for fine-tuning after an initial estimate. Ellis' guide documents this in full detail at ellis3dp.com.
-
3Tower method (works on any firmware) Print a tall tower with PA varying from bottom to top. Read the K from the layer where corners transition from blobby to sharp. Coarser resolution than the line method but requires zero slicer integration — useful on Marlin machines without built-in calibration.
After tuning: document the result per filament and per temperature in your slicer's filament profile. Don't carry PLA's K into a PCTG spool. Don't carry PETG at 230°C into PETG at 250°C. Five minutes of re-calibration saves hours of troubleshooting.
What's NextThe Bigger Picture
Pressure Advance isn't exotic firmware magic. It's a direct compensation for physics: pressurized molten plastic doesn't start and stop instantly, and every material has a different amount of give in the melt zone.
Once your PA is dialed in per-filament, the next lever to pull is Input Shaping — resonance compensation that reduces ringing and ghosting at high speed. The next post covers it in full. Critically: Input Shaping changes your printer's effective acceleration profile, which invalidates your PA calibration if you enable it in the wrong order. We'll cover how to sequence them and why the order matters.
Input Shaping: Why Enabling It Broke Your Prints
Resonance compensation, why it interacts with PA, and the right sequence to tune both.
Precision Parts, Functional Materials
Every DuffAM part ships with PA calibrated per material at print temperature — PETG, PCTG, ABS, and ASA. The Light Puck bundle is a great place to start.
Order Direct at DuffAM