
You've dialed in your Z-offset, you're using the leveling routine your printer shipped with, and the part still comes off the plate with a base that's visibly wider than the rest of it. So you sand it, or you tell yourself it's cosmetic and move on — until the day that same part needs to press-fit into a housing and the bottom quarter-inch simply won't go in. That's not a finishing problem. That's a dimensional defect with a name: elephant's foot, and it's costing you tolerance at exactly the spot — the base, where most parts actually mate to something — you can least afford to lose it.
| Symptom / Value | What It Means |
|---|---|
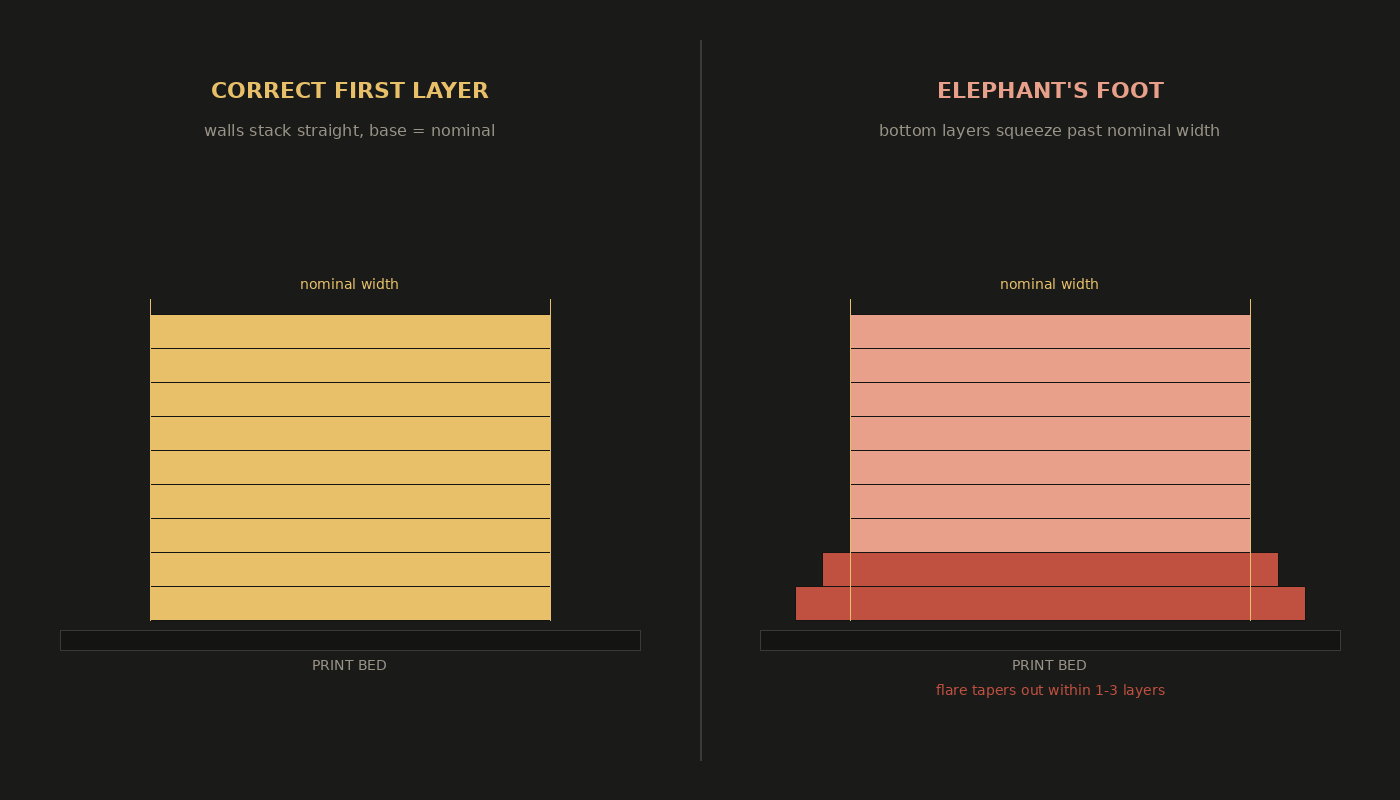
| Bulge is confined to the bottom 1–3 layers, tapering to nominal width above | Classic elephant's foot — squish, not warping or shrinkage |
| A 20mm boss measures 20.3–20.5mm across the bottom 0.5mm, dead-on above it | Confirmed by caliper — this is a Z-offset or compensation problem, not a slicer tolerance setting |
| Flare width is consistent across every part in a build, regardless of geometry | Systemic first-layer setting, not a part-specific issue |
| Flare is worse on parts with large flat first layers than tall thin ones | Weight and thermal mass are compounding a marginal Z-offset, not just the offset alone |
| Elephant foot compensation is already enabled but the flare persists | Compensation value is set below the actual measured excess, or it's fighting horizontal expansion |
| Press-fit holes near the base of a part are tight or impossible; the same hole higher up fits fine | Textbook elephant's foot signature — the defect is location-specific, not a global scaling error |
The Bulge Is a Measurement, Not a Look
Elephant's foot happens because the first layer isn't behaving like the layers above it. It's pressed against a bed that's holding heat, it's carrying the weight of every layer printed after it, and depending on your settings, the nozzle may be squishing it slightly flatter and wider than the slicer intended before it's had a chance to stiffen. The plastic has nowhere to go but sideways. One layer of sideways-going plastic is easy to write off as a finishing quirk. The problem is that it's not one layer's worth of error — it's a location on the part, and it's exactly the location most parts actually depend on for fit: mounting bosses, press-fit shafts, snap-fit lips, and anything that sits inside a housing built to someone else's tolerance.
A 20mm diameter boss that measures 20.4mm across its bottom half-millimeter isn't a cosmetic outlier — it's a part that fails a go/no-go gauge check. And because the flare tapers out within a layer or two, it's easy to measure the part at mid-height, get a number that looks perfect, and ship it anyway.
Three Causes Produce the Same Symptom
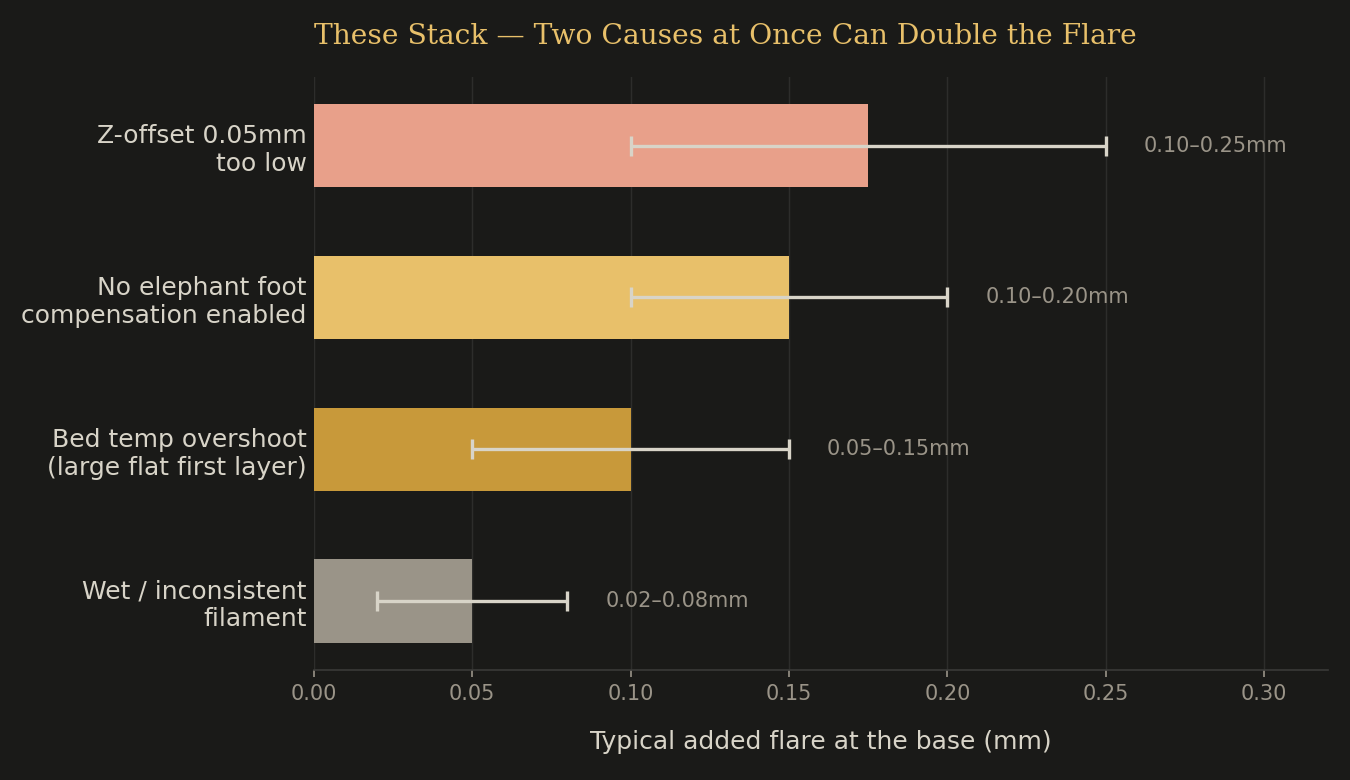
Elephant's foot almost never has a single cause, which is exactly why "just turn on compensation" fixes it for some people and does nothing for others. There are three independent contributors, and any combination of them can produce the same visual result:
Z-Offset, Too Low
- Nozzle sits closer to the bed than the layer height accounts for
- Forces plastic outward instead of stacking vertically
- Every 0.05mm too low adds real, measurable flare
Bed Temp & No Compensation
- Hot bed keeps the first layer soft under the weight above it
- Large flat first layers carry more thermal mass, flare more
- Compensation set to 0 leaves the entire error uncorrected
A properly zeroed Z-offset with compensation left at its default is often "good enough" — right up until a large flat part or a slightly-too-hot bed stacks a second cause on top of the first, and the flare shows up on one part type but not another.
DiagnosisIsolating Which Cause You've Got
Don't start by changing elephant foot compensation. Start by confirming the flare is actually elephant's foot and not something else wearing its symptoms — a locally low bed mesh point, or ordinary warping that happens to show up at the base.
- 1Confirm it's bottom-only. Caliper the part at the base and again 5–10mm up. If the excess disappears within the first few layers, you're looking at elephant's foot, not shrinkage or warping.
- 2Check for consistency across parts. If every part in a build shows the same flare regardless of shape, it's a global first-layer setting. If it's one part in one spot, check the bed mesh at that XY location before touching global settings.
- 3Re-verify true Z-offset before adding compensation. A paper test or a live-leveling readout that's drifted 0.03–0.05mm low will produce flare that no amount of elephant foot compensation fully fixes — you're compensating for a calibration error, not a material property.
- 4Set compensation to the measured excess, not a default guess. If the base measures 0.3mm over nominal, set compensation close to 0.15mm per side — not the slicer's stock 0.1mm, and not a round number picked at random.
- 5Watch for double-compensation. Horizontal expansion (hole/negative offset) settings and elephant foot compensation both shrink geometry near the base. Stacking both without accounting for the overlap can undershoot holes that were fine everywhere else.
- Measure at the base and 5-10mm up before changing any setting
- Rule out a local bed mesh error before assuming it's global
- Re-confirm Z-offset before raising compensation
- Set compensation to the actual measured excess, not the slicer default
- Check horizontal expansion isn't double-correcting the same layers
Filament Condition Changes the Number
Moisture content adds noise to first-layer squish that has nothing to do with your Z-offset or compensation setting. Wet filament off-gasses as it hits temperature, and those micro-pops change extrusion consistency layer to layer — including the first one, where you're already fighting a marginal Z-offset. PCTG's modified CHDM structure keeps moisture absorption around 0.15%, lower than PLA and a real step up from standard PETG, so it holds a first-layer measurement steady from the first print of a spool to the last. That's one less variable to chase when you're trying to isolate whether a flare is a setting problem or a filament problem.
Treat It as a Number, Not a Feeling
The reason elephant's foot advice online is so inconsistent is that most of it treats the fix as a single slider: "turn on compensation, set it to 0.1mm, done." That works when the only thing wrong is a slightly generous default. It doesn't work when your real Z-offset has drifted, when your bed runs 5°C hot on large flat first layers, or when your filament's moisture content is adding its own noise to the mix. Measure the actual excess at the base, confirm your Z-offset independently of compensation, and only then dial compensation to match what you measured — not what the slicer suggested.
For parts where the base has to hold tolerance because it's mating to something else — a bearing bore, a press-fit shaft, a housing built by someone who isn't going to sand your part to fit — that's the exact class of dimensional accuracy problem DuffAM's process is built to catch before a part ships; see our realistic capabilities breakdown for where those limits actually sit.
Parts That Measure the Same at the Base as Everywhere Else
Every DuffAM print is Z-calibrated and compensation-tuned to the measured part, not a slicer default — so the bore that fits on part one still fits on part fifty.
Order Direct at DuffAM →The other silent dimensional-drift culprit — a worn orifice instead of a squished first layer.
Your Bed Isn't Warped — It's DomingIf the flare varies by XY position instead of appearing everywhere, the bed itself may be the root cause.