You've re-leveled the bed. You've cranked the bed temp, added glue stick, tried hairspray, printed a brim, then a bigger brim. The corners still peel up an hour into the print — sometimes cleanly off the plate, sometimes just enough to catch the nozzle and knock the part loose. Every fix you're reaching for treats this as an adhesion failure. It isn't one. The plastic isn't losing its grip on the bed — it's pulling itself off, and no amount of glue changes the physics doing the pulling.
| Symptom / Value | What It Means |
|---|---|
| Only corners and edges curl; center of the part stays flat and stuck | Differential shrinkage, not adhesion — keep reading |
| Whole print slides or pops off the plate as one piece | Actual adhesion problem — check Z-offset, surface prep, first layer |
| Curling gets worse the taller or wider the part is | More material cooling asymmetrically — shrinkage forces scale with size |
| Printing ABS, ASA, PC, or nylon in the open, no enclosure | Primary cause — ambient temp gradient is doing this |
| Curling shows up specifically at 90° corners, flat elsewhere | Geometry is concentrating the stress, not purely thermal |
| More brim or glue helps a little, then the same corner lifts anyway | You're fighting the pull with adhesive force instead of removing the pull |
It's Not Sticking — It's Pulling
Every thermoplastic shrinks as it cools from melt temperature down to room temperature. That part isn't news to anyone who's printed more than a few parts. What gets missed is that the shrinkage isn't the problem — the unevenness of it is. The bottom of your print sits on a heated bed and stays warm well into the job. The top and the outer walls are exposed to room-temperature air, cool fast, and contract first. That difference in cooling rate creates a difference in contraction, and the still-hot, still-soft material underneath has no way to resist the pull from material that's already stiffened above it. The corners — where two contracting edges meet and add their forces together — are where that tension shows up first and worst.
This is why more glue, more brim, and a slightly hotter bed setpoint only ever buy partial relief. You're adding resistance at the one point of contact — the bottom of the first layer — while doing nothing about the temperature gradient running through the rest of the part. Eventually the shrinkage force wins anyway, just a little later in the print.
The SpreadThe Shrinkage Spread
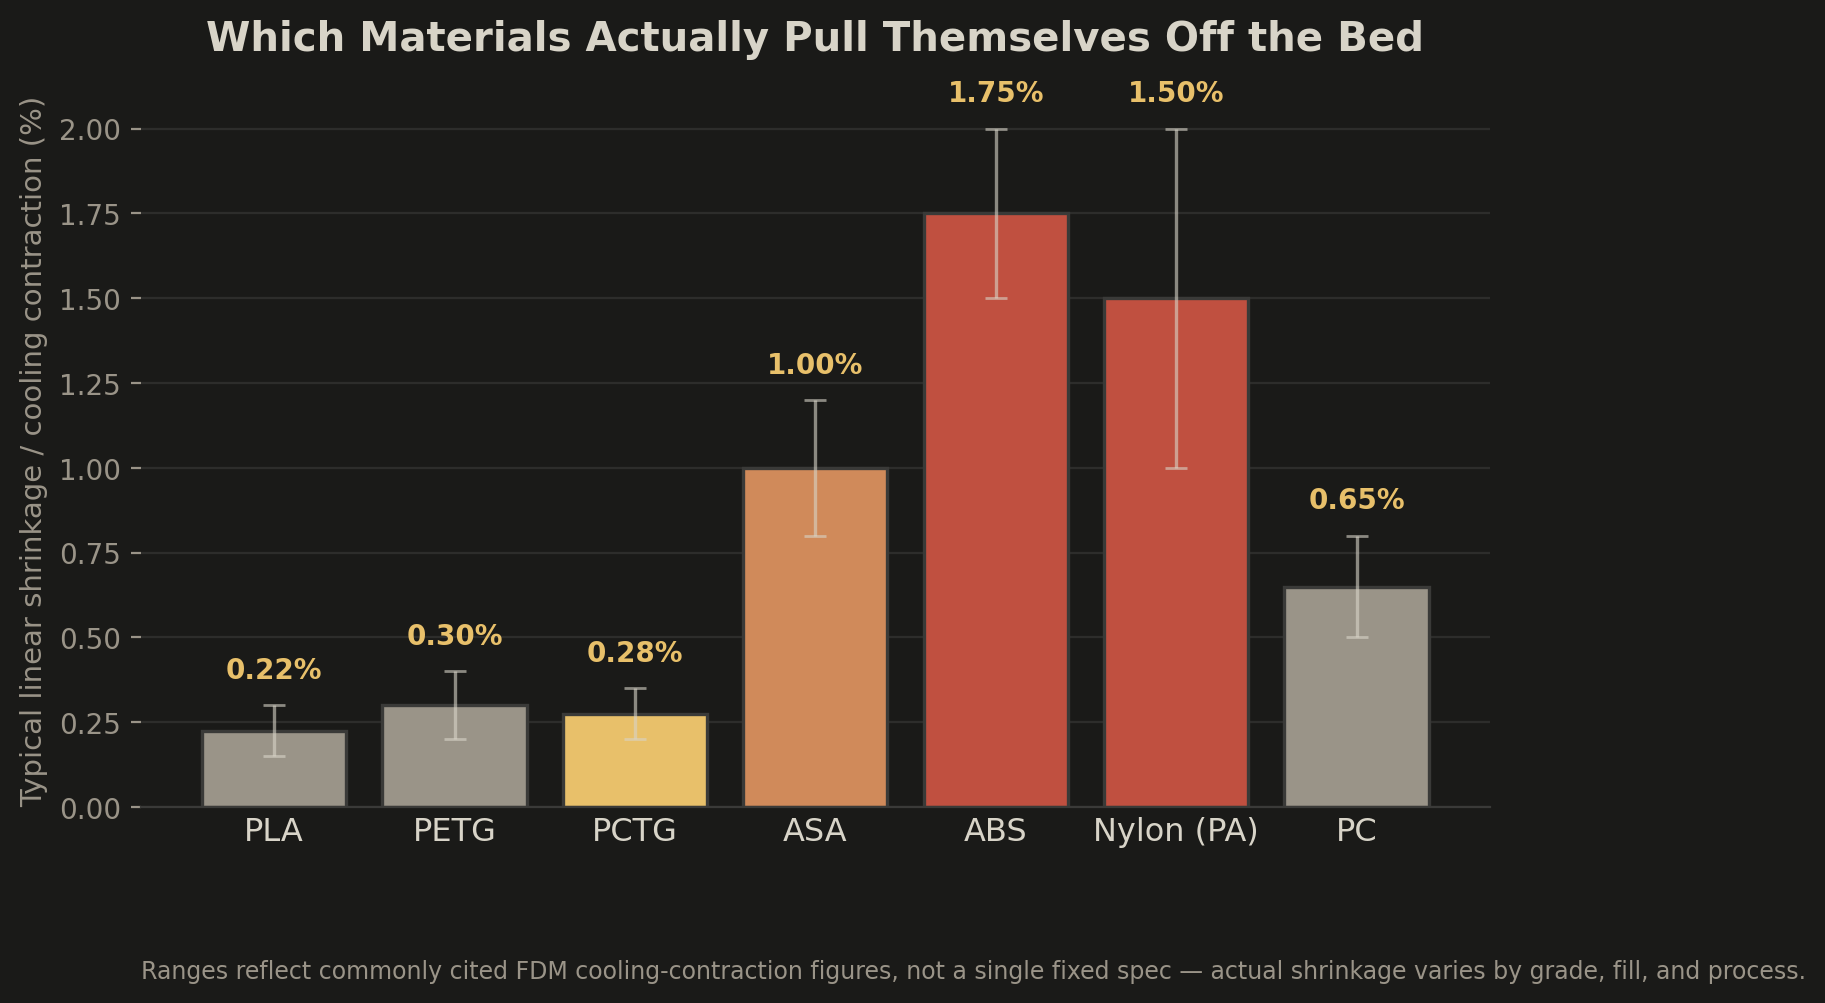
Not every filament pulls equally hard. ABS is the classic offender for a reason: it typically contracts somewhere in the 1.5–2% range as it cools, more than almost anything else on a typical filament wall. ASA is chemically similar but shrinks less, generally in the 0.8–1.2% band, which is part of why it's earned a reputation as "ABS that's easier to print" — it's not that different a material, it's just pulling with less force. Nylon is a different animal entirely: semi-crystalline, so its shrinkage is driven as much by crystallization as by simple thermal contraction, and it can warp aggressively even at a reasonable ambient temperature if moisture or cooling rate aren't controlled.
High-Shrink / High-Risk
- ABS — 1.5–2% typical contraction
- Nylon (PA) — crystallization-driven, unpredictable without moisture control
- ASA — 0.8–1.2%, better than ABS, still needs an enclosure
Low-Shrink / Low-Risk
- PLA — effectively negligible shrinkage risk
- PETG — low, rarely needs an enclosure for warping alone
- PCTG — tracks close to PETG, well below ASA
Diagnosing It Without Guessing
Work through it in order — each step rules out a bigger, more expensive fix before you get to the next one.
- 1Enclose it. An enclosure holding ambient air at 35–55°C cuts the top-to-bottom temperature gradient dramatically. It's the single biggest lever available and the one most open-frame printers are missing entirely.
- 2Match bed temp to the material's Tg, not a number that felt right. ABS wants roughly 100–110°C, ASA 90–105°C, PC 110–130°C, nylon 70–90°C. Below Tg, the plastic stiffens and the shrinkage force wins outright.
- 3Round the corners. Sharp 90° corners concentrate stress in a way rounded corners don't. A small fillet, or a mouse-ear disc printed under just the problem corner, can solve a stubborn lift without touching the process at all.
- 4Kill stray airflow. A part-cooling fan hitting the outer wall too early, or a cracked enclosure door, undoes a lot of what the enclosure is buying you.
- Confirm it's corners/edges only, not the whole print, before treating this as shrinkage
- Enclose the printer and target 35–55°C ambient before anything else
- Hold bed temp near the material's Tg, not just a comfortable setpoint
- Fillet or mouse-ear sharp 90° corners in the model itself
- Check part-cooling fan and draft exposure on outer walls
- Stop compensating with more glue or a bigger brim once the real cause is fixed
The PCTG Exception
PCTG's low shrinkage — close to PETG's, thanks to its modified CHDM structure and moisture absorption around just 0.15% — makes it one of the more forgiving engineering filaments for anything with sharp corners or tall vertical walls that would otherwise be a warping risk in ASA. It doesn't match ASA's UV and outdoor-weathering performance, so it's not a drop-in swap for every application, but for indoor or enclosure-adjacent parts where the geometry is the real problem, it's worth considering before reaching for a hotter, harder-to-tame material.
The Fix Is Thermal Management, Not More Glue
None of this gets solved by improving how well the plastic sticks to the plate — it gets solved by shrinking the temperature difference the part experiences as it cools. Enclose the printer, hold the bed near the material's actual transition temperature rather than a number that felt right, round off the corners that are concentrating the stress, and keep stray airflow off the part until it's had a chance to cool as a whole rather than in pieces. Do that and the glue stick becomes optional again.
If a part's geometry pushes right up against what any given engineering filament can handle without warping — sharp internal corners, tall thin walls, tight dimensional tolerance on a material that fights you the whole way there — that's the kind of judgment call DuffAM makes before a part ever goes into production. See the realistic capabilities breakdown for where those limits actually sit.
Parts That Don't Fight Their Own Cooldown
Every DuffAM production run is enclosed and thermally managed to the specific material's Tg — so the corner that would lift on an open-frame printer stays flat, batch after batch.
Order Direct at DuffAM →